Sunday, December 18, 2005

ASL Glove

I would like to start by saying that any success and accolades this project receives are in great part due to the hard work and ingenuity of my teammates Steve, Langdon and Adam. For this I owe them a debt of gratitude.

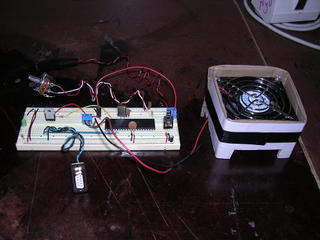
The final glove worked better than I had expected, given the 26 distinct actions and positions that make up the ASL alphabet. We were able to translate most of the ASL into sound and graphics, which was our goal. Here is a link to a power point presentation that explains the system and ASL.

PLAY


More info on the ASL glove can be found by following these links:

Steve's Blog

Langdon's Blog

Adam's Blog

Friday, October 28, 2005

Smack Down


Thank god this week is over. It was looking a little sketchy for a while, but it all came together in the end, everyone had fun and nobody got hurt.

The week started off with investigating sound generation. We divided the team into 2 groups: two of us looked into MIDI, and the other two researched getting sound out of processing via SONIA.

I worked on the MIDI side of things and found the code quite easy (copied right out of the Physical Computing book.) Hooking up the breadboard to a MIDI synth was also a breeze, and getting different sounds out of it was pleasing. It does have its limitations though as we were just getting one note at a time, be it from a trumpet or a harpsichord. It lacked the entertainment value and pizzazz that we were hoping to achieve with our project, however we did have it up and running rather quickly.

Sadly, the problem with the sensors persisted. We continued to struggle with inconsistent signals from the paddle, making it hard to develop a reliable system. If we set our threshold to a high number, it would take a mighty smack on the paddle to produce a sound out of the MIDI. If we set the threshold low, the slightest vibration would cause a steady stream of numbers to flow from the sensor in the paddle. And then to make matters worse, occasionally the sensor would just stop sending numbers altogether. Combine all of this with other midterms and the usual time pressures, and you have a team that is close to implosion.

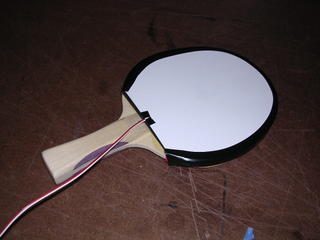
In a last ditch effort, we turned to past experience and Steven tracked down a second year student who had done a similar project last term. After picking his brain, Steven replicated his paddle design with some PIEZO buzzers from RadioShack and Gorilla glue. This was the winning combination that produced a reliable paddle. We also used a program from Tom Igoe that helped set up a variable threshold that worked better than the one we had cobbled together ourselves. The team also worked on the processing/SONIA so I’ll let them explain how that coalesced (I was in class at the time.) Their work did allow us to use our own recorded sounds, much to everyone’s delight. -TA

I’m going to post the code here in case no one else does:


' Define ADCIN parameters
DEFINE ADC_BITS 10 ' Set number of bits in result
DEFINE ADC_CLOCK 3 ' Set clock source (3=rc)
DEFINE ADC_SAMPLEUS 20 ' Set sampling time in uS

PeakValue var word
SensorValue var word
LastSensorValue var word
Threshold var word
Noise var word
PingPong VAR WORD

PingPong = 420

' serial pins and data reate:
tx var portc.6
rx var portc.7
n9600 con 16468

Threshold = 50 ' set your own value based on your sensors
PeakValue = 0 ' initialize peakValue
noise = 5 ' set a noise value based on your particular sensor

' Set PORTA to all input
TRISA = %11111111
' Set up ADCON1
ADCON1 = %10000010

Main:
' read sensor on pin RA0:
ADCin 3, sensorValue

' check to see that it's above the threshold:
If sensorValue >= threshold + noise then
' if it's greater than the last reading,
' then make it our current peak:
If sensorValue >= lastSensorValue + Noise then
PeakValue = sensorValue
endif
' if the sensorValue is not above the threshold,
' then the last peak value we got would be the actual peak:
Else
If peakValue >= threshold then

' this is the final peak value; take action
'serout2 tx, n9600, ["peak reading", DEC peakValue, 13,10]
'serout2 tx, n9600, [DEC peakValue]
serout2 tx, n9600, [DEC pingPong]
endif

' reset peakValue, since we've finished with this peak:
peakValue = 0
Endif

' store the current sensor value for the next loop:
lastSensorValue = sensorValue
Goto main

Processing:

import pitaru.sonia_v2_9.*;
import processing.serial.*;

int bgcolor; // background color
int fgcolor; // fill color
Serial port; // the serial port
int[] serialInArray = new int[3]; // where we'll put what we receive
int serialPong = 0;
int serialCount = 0; // a count of how many bytes we receive
float xpos, ypos; // Starting position of the ball
boolean firstContact = false; // whether we've heard from the microcontroller

Sample bounce;

void setup() {
size(256, 256); // stage size
noStroke(); // no border on the next thing drawn

// Set the starting position of the ball (middle of the stage)
xpos = width/2;
ypos = height/2;

// print a list of the serial ports, for debugging purposes:
println(Serial.list());

/* I know that the first port in the serial list on my mac
is always my Keyspan adaptor, so I open Serial.list()[0].
On Windows machines, this generally opens COM1.
Open whatever port is the one you're using.
*/
port = new Serial(this, Serial.list()[0], 9600);
//port.write(65); // send a capital A to start the microcontroller sending

Sonia.start(this); // Start Sonia engine.
// create a new sample object.
bounce = new Sample("pingpong.wav");

}

void draw() {
background(bgcolor);
fill(fgcolor);
// Draw the shape
ellipse(xpos, ypos, 20, 20);
// get any new serial data:
while (port.available() > 0) {
serialEvent();
// note that we heard from the microntroller:
firstContact = true;
}
// if there's no serial data,
// send again until we get some.
// (in case you tend to start Processing
// before you start your external device):
//if (firstContact == false) {
// delay(300);
// port.write(65);
//}

}

void serialEvent() {
processByte((char)port.read());
}

void processByte(char inByte) {
// add the latest byte from the serial port to array:
serialInArray[serialCount] = inByte;
serialCount++;

// if we have 3 bytes:
if (serialCount > 2 ) {
//xpos = (float)serialInArray[0];
//ypos = (float)serialInArray[1];
//fgcolor = (int)serialInArray[2];

serialPong = (int)serialInArray[0];
println(serialPong);

if (serialPong == 52) {
bounce.play();
}
// send a capital A to request new sensor readings:
//port.write(65);
// reset serialCount:
serialCount = 0;

}


}
// Safely close the sound engine upon Browser shutdown.
public void stop(){
Sonia.stop();
super.stop();
}

Sunday, October 23, 2005

If it ain't got that swing...

As part of our ongoing second project, I built two more prototypes to evaluate different sensors. The two sensor used were Piezo vibration (DigiKey #MSP1007-ND), and Force (DigiKey #102-1214-ND).

The Force sensor seemed to hold a lot of promise, as we were trying to sense when the ball is struck by a paddle. After all, that’s the focus of the project: to get the input of ball hitting paddle to create output as some other signal. For prototyping purposes, I just programmed an LED to light as my output.

Initially I peeled back the rubber pad on one side of the paddle and slipped the Sensor underneath it, and replaced the pad. This would have been a perfect solution because it was clean and tidy, but proved to be insufficient. The rubber pad dampened the collision force, and the readings were weak and sparse. If you didn’t hit the ball exactly where the sensor was or within close proximity, you got not reading at all.

For the second attempt, the sensor was placed on top of the rubber pad, and then covered with a stiff membrane (chipboard). This worked much better; no matter where you hit the ball with the paddle, the force was transferred to the sensor. We got plenty of useful readings from the sensor but the team felt that having to put the covering over it detracted too much from the original look and feel of the paddle.


On to Piezo

I was surprised when the Piezo sensors arrived because they were miniaturized versions of the Flex sensor accelerometer that I built a week ago. Working quickly, I designed a third prototype by taping the Piezo sensor to the paddle. These sensors worked fantastically, giving off tons of data. Too much so, in fact. The sensors are so sensitive that just holding the paddle steady, there’s enough vibration in your hand (time to switch to decaf?) to send a steady stream of data out to the PIC.

The challenge then was to develop a filter in the software that would only pass on a signal when the paddle struck the ball, not merely the slightest vibration or wiggle. The raw numbers coming in from the paddle ranged from 30 to 650. Tapping a ball with the paddle produced numbers from 400 to 600. The next step was to set up a filter that would knock out anything under what we thought a ball/paddle collision would produce. This presented a problem because the force of the ball hitting the paddle is always different, therefore it is never consistent. So if we set the filter to eliminate any numbers under say 350, just holding the paddle wouldn’t produce any signal. This seemed to work fine however once a ball was struck, we would then get multiple signals. After analysis, we determined that the problem was produced by the sensor continuing to reverberate after the paddle struck the ball. For instance, if a collision produced a reading of 425, we would then get a slowly descending string of readings from 425 down, until we hit the filter at 350.

To rectify this problem we introduced a new variable into the software that would represent the initial reading of a collision (the highest). We then used this reading as our cut-off point in the filter. After a set amount of time, the filter would be reset to a lower setting in anticipation of the next swing of the paddle. This produced much better results and only one output signal per collision. Unfortunately, the force of swinging the paddle sometimes was great enough to trigger the sensor as well. Much like the Flex sensor accelerometer I developed for my last prototype!

I felt that this could be interesting in our project, for we could create an event that happens when you swing the paddle and another one when the paddle collides with the ball. Sadly, my teammates were skeptical of the sensor protruding from the backside of the paddle and voted to go with the Drum trigger.


Here's the code:


Spacer = 0

Threshold = 300


main:


High PORTD.1

pause 100

Low PORTD.1


ADCIN 0, ADCvar ' Read channel 0 to adval

If ((ADCvar/2) > Threshold) then

serout2 PORTC.6, 16468, [DEC ADCvar/2, 13, 10] ' print it to serial out,

pause 250 ' with linefeed and carriage return (10, 13)

Spacer = 1


endif


IF (Spacer = 1) then

High PORTD.2

Pause 100

Low PORTD.2

Spacer = 0

Threshold = ADCvar

ENDIF


if (ADCvar/2 < 200) then

Threshold = 300

endif

LABS for week 5 and 6


DC motor control

After searching in vain for the Texas Instruments h bridge, I decided to just use a single transistor (TIP 120) and forgo the reversible motor control. With a single transistor, it should be possible to control the speed of the DC motor through pulse width modulation. This is something that I found was easier said than done.

It’s a little tricky building the circuit for the DC motor control. The circuit includes a TIP 120, a diode and the DC motor. The difficulty comes from the fact that the DC motor requires more power (12v) than the logic level power (5v) we normally use on our breadboards.

I hope to control my DC motor speed with the potentiometer delivering analog data to the PIC. The PIC would then convert it to digital data outputting it to the TIP 120 as a pulse width. I managed to do this however I was unable to adjust the range of the pulse width so I never had the motor speed fine-tuned.


Serial Out

This was an especially satisfying lab as it finally dawned on me how we are going to combine what we are learning in Physical Computing with what we are learning in ICM. Having no programming background, both classes have been extremely daunting and I have struggled mightily to grasp the minutiae of how code is written. It’s like a whole new language!

After struggling for an entire weekend over how to get my serial data out to PC and into Processing, I finally took the advice of my fellow students late Sunday night and simply copied and pasted from one of the examples. Seems rather pathetic, but I did celebrate being able to successfully copy and paste, at that point being so completely frazzled I was ready to throw my laptop out the window.

Once the example was up and running, it was easy for me to combine my processing code with the example’s serial IN portion. On the PIC side, I had to change a few little things and adjust the range of the variables that were output and I was good to go. It was very exciting to be able to control the actions in Processing by turning a potentiometer or by covering up a photocell.

Friday, October 14, 2005

Flex Sensor Accelerometer?!?


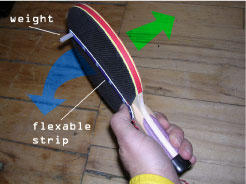
This prototype is an attempt to sense the movement of a ping pong paddle being swung—not only the paddle’s movement , but also the difference in the velocity of the swing.


The prototype works on the idea of inertia—the tendency of a body at rest is to remain at rest. As the paddle swings forward (green arrow) the weight will want to stay in its resting position. As the paddle moves away from the weight, the plastic strip will start to bend given the resistance of the weight’s inertia (blue arrow.) Bending the strip bends the attached Flex sensor, which in turn changes the resistance to the voltage passing through it. The faster the swing, the more the strip bends, the more resistance is generated.

To make the prototype I used a Flex sensor, some thin sheet plastic (in this case, styrene), a bolt and nut, wire, a little tape, and some wood screws.

First, I cut the plastic into a thin strip with a wider tab on one end. I then drilled a hole in the thin end to pass the bolt through, and two more holes down at the tab end for the wood screws. I put a bolt through its corresponding hole and threaded it on the nut. The bolt and nut will act as a weight in the system. After that, I secured the Flex sensor to the plastic strip (just beneath the bolt) with a little clear tape. I then laid the strip against the flat part of the paddle (Flex sensor side facing the paddle) and lined up the tab to the paddle’s handle. The plastic strip was attached to the handle with the wood screws. I secured the wires with a bit of electrical tape, just to clean up the appearance and to protect the contacts on the sensor from any potential abuse.

Monday, October 10, 2005

Rock the Bells


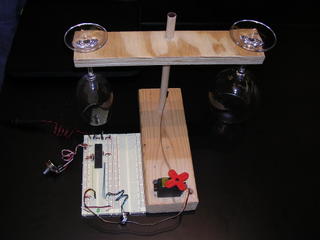
The week 4 lab had us adding a servo motor to our board of tricks. The installation of the servo was quite easy, but the programming was a bit trickier.

Unlike most motors, a servo motor’s rotation is limited to a set amount. In the case of the motor we are using, the motor will rotate just over 180 degrees. I planned on controlling the servo with a potentiometer, converting the analog input into values that could be used to control the motor. This took a little bit of back and forth to dial in; I adjusted the constants in order to get the maximum rotation out of the motor. Once this was accomplished, it was time to try to build something to make use of this new motor.

As I contemplated the back and forth action of the motor, trying to decide what it would be good for, I also started digging around the junk bins in the shop, looking for inspiration. I came across a radio control toy, but just the controller, no car in sight. The antenna caught my attention—supper whippy with a plastic tip, it seemed well suited to the servo’s back and forth motion. I removed the antenna from the controller, and started to play with it. It seemed like it would make a nice percussion instrument, as I snapped it against the table. I decided this would be the first part of my device and with a few bends I attached the antenna to the servo motor.

Now for something to smack! I first considered using two plastic cups, aluminum cans, or chunks of pipe. They all seemed like they might produce a good sound, but I was hoping for something with more charisma. I considered stopping in a toy store to look for something to appropriate, but as my time was limited, I never got the chance. Fortunately, the window display at Astor Place Liquors provided the solution.

After purchasing two crystal wine glasses to act as my bells, it was just a simple matter of assembly. I found some wood and made a base on which to mount the motor. From the base I erected a dowel onto which I fastened a cross bar. The cross bar suspends the wine glasses in an upside down orientation. The device works by rotating the potentiometer, causing the motor to rotate. The wire antenna turns with the motor until it is caught on the dowel. The antenna flexes until it bends far enough to slip past the dowel, initiating a forward whip and striking the dome of the wine glass, producing a ringing tone. Turning the potentiometer in the other direction causes the motor to rotate back, reproducing the same effect on the second wine glass.

Observation Project 2

Ping Pong Observation project week one

Follow the link below:

Link to PingPong

Monday, September 26, 2005

Observation Proposal

Observation Proposal

We would like to propose an interactive table. This table would sense the user’s presence and respond to it by changing its aura. Our goal is to modify the behavior of the typical Starbucks customer, by encouraging him or her to share his or her table, and interact with other customers, rather than burying their heads in laptops or textbooks. The reward for doing so will be the discovery of the various aura states that the table can achieve. And of course an added benefit will be more social interaction.

The system is based on the present 36” diameter café table used throughout Starbucks, a table designed to seat four. We would replace these existing tables with one of our own design, allowing the technology to be embedded seamlessly within.

The table would be manufactured in a durable translucent plastic, such as polypropylene. Its aura would be controlled by a cup of coffee and a system made up of simple electronics, all residing on the underside of the table. The table would have four screenprinted designs reminiscent of coasters distributed evenly around the top. They would act to subtly encourage users to place their cups in specific places. On the underside of the table, a group of four photo-sensors would be placed to correspond to the location of the coasters. The photo-sensors would provide analog input to a microcontroller, which would interpret the signal and create digital output. The digital output would control four separate arrays of LEDs. Each array would be made of a single color: red, green, blue, and yellow. The LEDs would be spread throughout the table and when turned on, would produce the table’s gentle glow. The system would also require a power supply.

The initial point of interaction is placing the cup of coffee down on the table. If the coffee is placed on the coaster, light will be prevented from reaching the photo-sensor, and will change the signal it is sending to the microcontroller. The microcontroller program will need to look not just for change in each input but also compare the input with a series of if then/else statements, to determine where the triggered sensor is. There are six possible array states depending on the number of sensors activated, and their proximity to one another. The first state is the available table, where there are no changes in the input signal, and the blue LEDs are turned on. In the second state, one input is triggered and the red LEDs are turned on and added to the blue ones. In the third state, two inputs are triggered, and if they are neighboring sensors, just the red LEDs will remain on; if the sensors are not neighboring, then the red, blue and yellow LEDs are turned on. When three sensors are triggered, the aura switches to a fourth state, turning on just the red and yellow LEDs. The final state is the one in which all the photo-sensors are triggered, and the microcontroller turns on all four LED arrays.

The program that runs the microcontroller will also need to control the timing used when switching between states. It would become rather annoying to sit at a table that was blinking like a disco floor every time you took a sip of coffee. A slow fade would be nice.

Sunday, September 25, 2005

Photos


general atmasphere


Happy customers


Seating area


Counter area